Settings

Managing your organization's settings.
Managing your organization
When first logging in to the Porta Admin page, you will be redirected to the Dashboards page. Next, navigate to the Organization settings page located in the General Settings under the Settings module.
When entering the General Settings page, information about your organization will be shown.
You will be presented with text fields that specify the information they output regarding your organization's general settings.
Organization Name - Name of the organization you would like to create. This is the name that an end-user will view in various interactions with you relating to their identities. Unique logical identifier, which cannot be changed. May contain lowercase alphabetical characters, numbers, underscores (_), and dashes (-). Can start with a number. Unlimited number of characters can be used.
Address - Your organization’s address can be displayed in email templates if Porta’s default templates are used.
City - Your organization’s city.
Country - Your organization's country
Support Email - When a custom email provider is not configured, and Porta’s default templates are used, users will be able to reach out to your organization via the email entered here.
Support URL - The support URL links to a page maintained by your organization. Its purpose is to allow users to contact you if they experience problems, desire new features, or ask questions about your applications.
Under the same settings, one can add URLs that link users to your Cookie Policy, Terms and Conditions, and Privacy Policy URL. These are displayed to end-users using Porta in the various communication channels, such as login, registration, emails, and user profiles.
Cookies URL - Websites typically use cookies to ensure that users are recognized when they move between pages, so they don't get asked to log in again every time. To inform users of your cookies policy, you can add a URL to access your policy.
Terms and Conditions URL - Terms and Conditions set out the key commercial terms you are offering to your users and help the contractual parties to understand their duties, rights, roles, and responsibilities. To inform users of your Terms and Conditions, you can add a URL to access the policy. The link that is added here is used on the login, registration, and user profile pages for users to easily access the procedure set forth.
Privacy Policy URL - The act’s purpose is to establish rules to govern your organization’s collection, use, and disclosure of personal information. The link that is added here is used on the login, registration, and user profile pages for users to easily access your privacy policy.
Under the same settings, one can add URLs that link users to your various Social Media pages.
Facebook URL - Every profile on Facebook has a unique URL, just like other pages on the Internet. This URL may be a name or nickname or a string of random-looking characters; either way, it will take a browser directly to your organization’s Facebook page. This is used if the Porta’s default mailing service is used for sending emails to users.
Twitter URL - Every profile on Twitter has a unique URL, just like other pages on the Internet. This URL may be a name or nickname or a string of random-looking characters; either way, it will take a browser directly to your organization’s Twitter page. This is used if the Porta’s default mailing service is used for sending emails to users.
Instagram URL - Every profile on Instagram has a unique URL, just like other pages on the Internet. This URL may be a name or nickname or a string of random-looking characters; either way, it will take a browser directly to your organization’s Instagram page. This is used if the Porta’s default mailing service is used for sending emails to users.
Check the Members section to see all the members of our application.
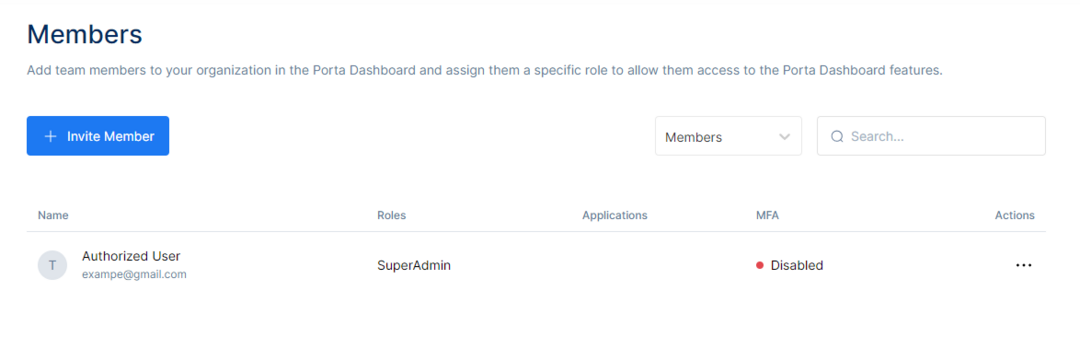
Each member will have a Name, Role, Application in which they are a member, and Multi-Factor Authentication to see if that user has it Enabled or Disabled.
To invite a new member, click the Invite Member and a new window will pop up.
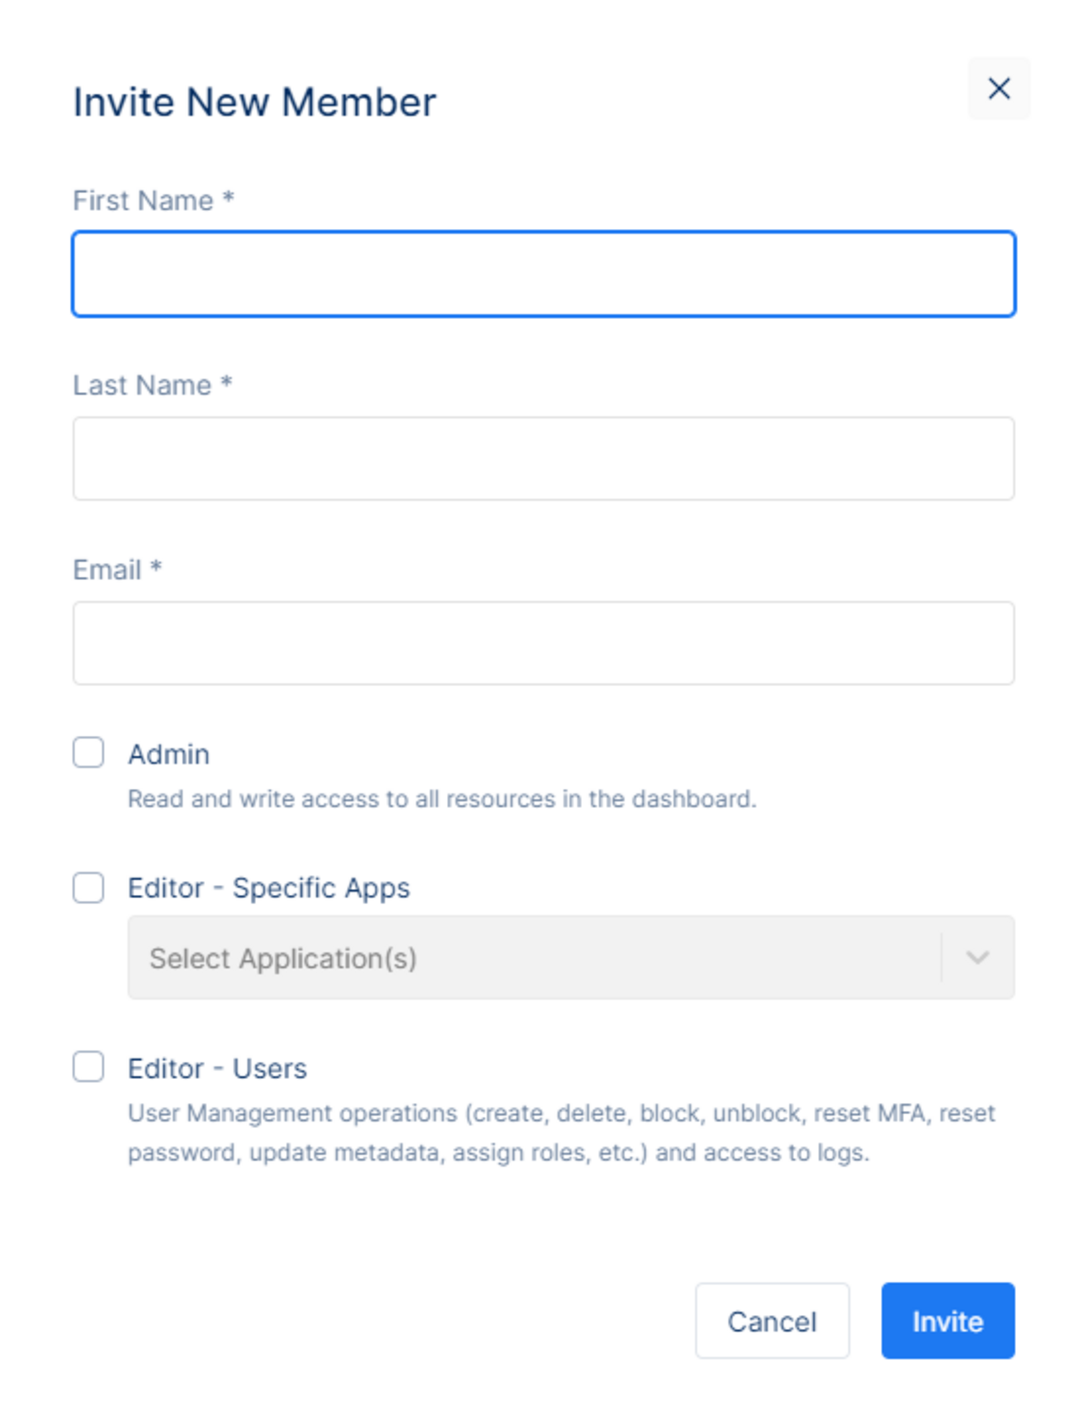
Once the window opens up, input information such as Name, Last Name, and Email.
After filling the required fields, specify a role for that specific member.
Admin role - the member will have read and write access to all the resources in the dashboard. This role is particularly useful for the member in charge of administering Porta on your behalf. The administrator has unlimited access to all resources, is able to invite new members, assign roles, manage users, security settings, branding etc.
Editor in specific applications - the member will have read and write access in particular applications that the member is given access to. This role is particularly useful for developers who will be configuring Porta in order to retrieve the data needed to complete such configuration and customize the behavior of authentication when users are interacting with the application.
Editor / Users - the member, will have access to User Management to create, delete, block, unblock, reset MFA, reset the password, update metadata, assign roles, access to logs. This role is particularly useful for those members performing common customer support tasks to assist users in their identity related queries. Please note that these are all system roles and cannot be edited by the administrator. Porta does not offer an option to create custom roles and permissions.
After assigning the role to the member that is being invited, click on Invite to invite the member or Cancel to discard the changes.